 FlightTrack
 Version Française
Contents
IntroductionBuilt-in downloading
Using other maps
Built-in calibration
Example 1: Calibration of a digitized map
Example 2: Fine calibration of a downloaded Landsat image
Introduction
FlightTrack gives you the possibility to apply a raster image over the 3D terrain representation. It is also possible to use these images if you don't have the elevation data. They can be anything you can think of but usually you will use maps or satellite images that you can directly download from FlightTrack.
View with no map


Views with satellite map and road map (built-in download)
Built-in downloading
You can use FlightTrack to easily download a map or a satellite image for the area you are viewing. Just open the Maps panel, choose the kind of image that you want to download among Landsat satellite pictures or Microsoft Expedia road maps, select the area to download and press download. After a few seconds of patience, the map will appear directly in the 3D view.Landsat download time: Right after you click download, FlightTrack will send the area request to the Landsat server and the server will process it. During that period, there is no data transfer, and the progress bar is not moving. This is normal, you sometimes have to wait several seconds before the server sends some data.
Using other maps
It is possible to use other maps than those downloaded directly withing FlightTrack. Maps are simply bitmap images with additional geographic calibration information.1. Put the maps in the Library/Application
support/FlightTrack/Maps/ folder of your home directory. When
you relaunch FlightTrack or click on the refresh button of the Maps
Info window, your map should appear in the list if the format is
supported.
2. The second important point before
FlightTrack can use the map image is that it should be geographically
calibrated. That is to say, FlightTrack should have the necessary
information
to make a conversion between a geographic coordinates (e.g.
N43°12'/W001°43') and a pixel of the map (e.g. 12, 3456).
When calibrated, the geographic coordinates of the image center as well as other parameters such as the projection or the geographic scale will be displayed.
If the map is not calibrated (most simple image formats do not carry
geographic information along them so this will happen frequently), then
you can calibrate it directly within FlightTrack (see Calibration).When calibrated, the geographic coordinates of the image center as well as other parameters such as the projection or the geographic scale will be displayed.

Maps Info window for non-calibrated map

Maps Info window for calibrated map
Supported Map formats
Numerous image formats are supported thanks to the GDAL library used within FlightTrack. To see the list of formats supported, you should click on the Supported map formats button within the Maps Info window.As of version 0.0.16, the following formats can be used for maps:
| GTiff :
GeoTIFF NITF : National Imagery Transmission Format HFA : Erdas Imagine Images (.img) SAR_CEOS : CEOS SAR Image CEOS : CEOS Image ELAS : ELAS AIG : Arc/Info Binary Grid AAIGrid : Arc/Info ASCII Grid SDTS : SDTS Raster DTED : DTED Elevation Raster PNG : Portable Network Graphics JPEG : JPEG JFIF JDEM : Japanese DEM (.mem) GIF : Graphics Interchange Format (.gif) ESAT : Envisat Image Format BSB : Maptech BSB Nautical Charts XPM : X11 PixMap Format BMP : MS Windows Device Independent Bitmap AirSAR : AirSAR Polarimetric Image RS2 : RadarSat 2 XML Product |
PCIDSK :
PCIDSK Database
File PNM : Portable Pixmap Format (netpbm) DOQ1 : USGS DOQ (Old Style) DOQ2 : USGS DOQ (New Style) ENVI : ENVI .hdr Labelled EHdr : ESRI .hdr Labelled PAux : PCI .aux Labelled MFF : Atlantis MFF Raster MFF2 : Atlantis MFF2 (HKV) Raster FujiBAS : Fuji BAS Scanner Image GSC : GSC Geogrid FAST : EOSAT FAST Format BT : VTP .bt (Binary Terrain) 1.3 Format LAN : Erdas .LAN/.GIS CPG : Convair PolGASP L1B : NOAA Polar Orbiter Level 1b Data Set FIT : FIT Image USGSDEM : USGS Optional ASCII DEM (and CDED) GXF : GeoSoft Grid Exchange Format |
Built-in calibration
A map is calibrated when FlightTrack is able to know where the geographic coordinates of a point in the world are located in the map image. It is mandatory in order to use maps. FlightTrack will calibrate maps that are offered for built-in download but other maps have to be calibrated by yourself if they were not already. Built-in calibration can also be used to adjust a previously calibrated map.In order to calibrate a map, you have to select it in the list of the Maps info window and click on the Calibrate Map button. This will open the calibration window.
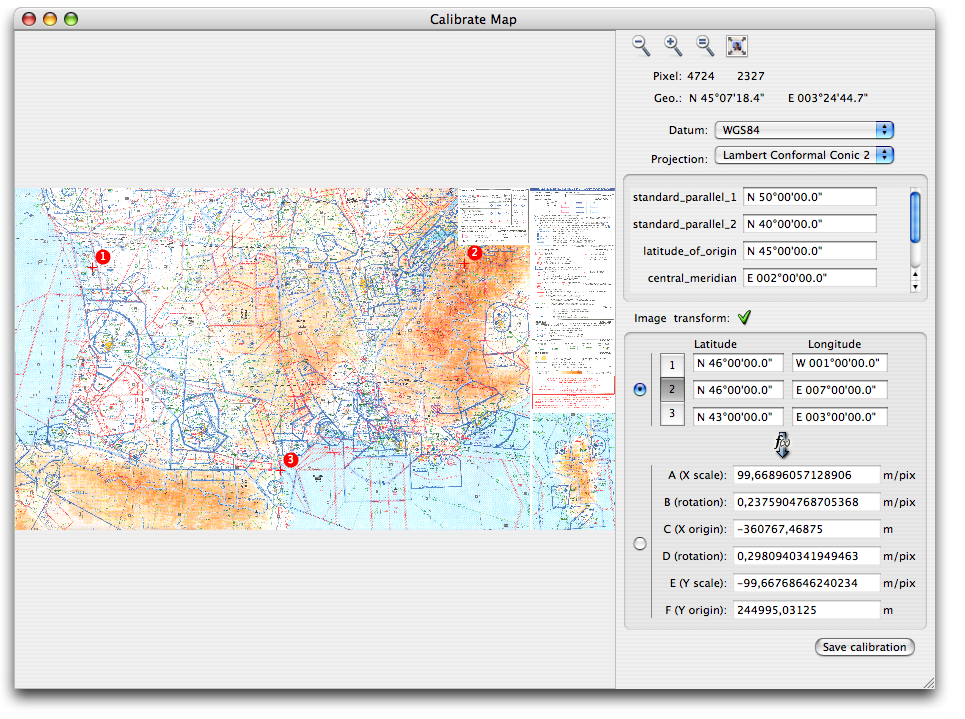
Calibration window
At first, the contents of this window might look a bit scary, but performing a calibration is fast and easy. This window is divided in 5 zones.
- The map image view displays the map that has been selected.
- The top-right buttons are used to adjust the zoom of the image. The next two lines display the position of the cursor over the image in pixels as well as the computed geographic coordinates (Geo.). The Geo. line remains blank until the minimum required information for calibration is provided.
- The Datum pop up menu is used to select the datum of the map. WGS84,
the most common datum, is selected by default.
- The projection pop up menu and associated box is used to provide
information about the projection used
by the map. Specifying a map projection is not mandatory but will
improve the accuracy of image placement over terrain and under tracks.
- The image transform box is used to provide information on the image transformation from projected geographic coordinates to the map image pixels. This step is mandatory.
The Save Calibration button will save the calibration and update the 3D view if the map was already used.
There are several means to calibrate a map. This page will explain you the two most common uses depending on what you want to do.
Projection
First, the type of projection has to be chosen. The default is to have no projection (None selected). If a projection is selected, the list of associated parameters are displayed in the box under the projection type.
Because of image transform, filling all parameters is not always necessary. Especially, false easting and false northing can be omitted. Usually, it is good to try with the elements you know (the one printed on the map legend) and leave other blank. For example, for a common projection such as Lambert conic conformal with 2 standard parallels, entering the two parallels is sufficient.
Image transform
This part of the calibration is essential, and mandatory. It is used to provide the parameters of the affine transformation used by FT to match geographic coordinates (converted to the appropriate datum and projected) to a pixel of the image. This transformation is described by the coefficients A to F.
These coefficients are computed by FT after selecting 2 or 3 points on the image and entering the corresponding geographic coordinates. They can also be entered directly by the user but this should not be necessary most of the time.
The user should click on the numbered buttons, then designate a point on the image, and enter the corresponding geographic coordinates. In order to allow FT to compute the transformation properly the 2 or 3 points entered should not all be vertically or horizontally aligned in the image. The best results are achieved when the points selected are as far as possible one from another.
Example 1: Calibration of a digitized map
In this section we'll see how to calibrate a digitized map, or any map image found on the internet.First, concerning the scanning process, it should be noted that the pixels dimensions of the image will affect FlightTrack performance without providing a better result. In the current version, the map is scaled until in can fit as a single texture in video memory. With the nVidia video card of my flat panel iMac, this leads to a maximum size of 2048x2048 pixels to avoid scaling.
The map image should be placed in the Maps folder. Select the image in the maps menu and click on the Calibate Map button to open the calibration window.
Datum and projection
All paper maps are projected. If the map depicts a large area (about 100 km per side), the projection will likely lead to significant non linear effects that have to be taken into account by FlightTrack to provide good results.Usually, the datum and projection used to create a map are written somewhere on the map:
Considering the information provided on the previous extract of the map, the Lambert projection 2 SP will be chosen in the projection menu and the appropriate parameters are entered:

As we can see, there are other
parameters but since the map does not provide more information, they
will be left empty.
Image transform


It is not necessary to enter 3 points if the map is perfectly scanned north-up, but it will always lead to better results.
The corresponding geographic coordinates are then entered:

That's all ! The map is now calibrated,
this can be checked by moving the cursor above the image and checking
that the geographic coordinates displayed are correct.
Example 2: Fine calibration of a downloaded Landsat image
Sometimes when you download a Landsat image, it is not located very acurately relatively to the terrain or to a track. It is very easy to adjust this, assuming it is only an absolute bias of the satellite image but that the scale is correct.For example, on the following picture, the selected track point should be right above the northmost point of the island.


When the calibration is saved, the map track is displayed at the correct location under the GPS track:

More info / Online map resources
http://erg.usgs.gov/isb/pubs/MapProjections/projections.html USGS article on map projections
http://seamless.usgs.gov/website/Seamless/ Worldwide data
http://glcf.umiacs.umd.edu/data/ Worldwide data sets
http://terraserver.microsoft.com/ North America data, precise satellite or aerial pictures
© 2002-2004, Gautier Taravella
Thanks to:

for hosting
for hosting